Strengthen your wrists
ASANAS FOR WRIST PAIN
Strengthen your Wrists
Most of us use our hands and wrists regularly and many times we feel tenderness or soreness in the wrists. This can be an impediment in our daily chores or even while doing some asanas.
Stretching and following these 9 Asanas will help improve the flexibility and strength of the wrists.
When practicing yoga, most people focus on the core, arms and legs etc. while wrists are easily forgotten, when the wrists are the most important part of our body, the part that is unknowingly used the most. Working on wrist strength, helps gradually improve strength in the arm and shoulders and other body parts.
Do these Yoga asanas regularly for strength and prevention of injury in your wrists.
Gomukhasana – Seated Asana
Gomukhasana literally translates into a cow face posture (go – cow, mukha – face, asana – pose). A seated yoga posture, Gomukhasana can be performed along with a set of different seated asanas.
Sit on the yoga mat with your legs folded comfortably in sukhasana.
Raise the left arm above your head and bend the upper arm backward at the elbow. Simultaneously, bring the right arm behind your back from down and interlock both hands.
Take deep breaths and stay as long as you are comfortable.
Now, as you exhale, release your arms.
Beginner’s tip:
Your left hand may not be able to reach the right hand and vice-a-versa initially. In which case, do not exert too much force. With practice of holding a scarf or belt in between both hands and , slowly by inching forward toward each hand you will be able to hold both hands eventually.
Contraindications:
Frozen shoulder, Shoulder pain or injury – refrain from doing Gomukhasana. If the pain in the shoulder is not much, do the posture under the supervision of a trained yoga teacher. People with Soft tissue injury in leg such Muscle tear or pain in thighs, Bleeding piles and those suffering from Spondylitis must refrain.
Benefits:
Cures sciatica
Helps reduce high blood-pressure
Regular practice tones and massages the reproductive organs
Stretches stiff shoulders
Strengthens back muscles
Strengthens wrist and arms
Stretches spine improves posture
Reduces stress and anxiety
Stimulates kidneys and abdominal organs
Strengthens muscles of ankles, hips, thighs, shoulders, triceps, inner armpits and chest.
Seated Garudasana – Seated Pose
In Sanskrit, Garuda is the name of the eagle which is the vehicle of Lord Vishnu. In the seated eagle pose, the two arms are brought together and the two fore-arms are twisted together. It gives a good stretch to the arms and the shoulder muscles.
I this asana, sit in a comfortable position on the floor with arms resting on the thighs. Sukhasana or the Easy Pose can be assumed by sitting cross legged on the mat. You may also do this sitting on a chair. Take the right arm under and around the left arm and make the right palm touch the left palm. At this point the two arms are inter-twined together like two snakes.
Keep the spine straight and relax the shoulders. Look straight ahead and breathe normally in this position. Hold the position for as long as you are comfortable.
To release the position, untangle the arms and bring the arms back to the thighs.
Repeat the same with the left arm twisting around the right arm.
Contraindications:
Elbow wrist shoulder injury
Benefits:
Stretches the joints of the wrists, elbows and shoulders.
Improves the posture of the upper back.
Straightens the spines and posture.
Removes stress from the shoulders and the lower neck region.
Opens up the shoulders and chest. It helps with stiff shoulders
Seated Garudasana is easy to practise and can be done anywhere – in the office or even while travelling. Just a minute of seated Garudasana can give a good stretch and relaxation from the stress built up in the shoulders.
Anjali Mudra & Paschim Namaskar – Seated Pose
Namaskar Mudra / Anjali Mudra
The gesture is incorporated into many yoga asanas. It is a Namaste, two hands folded in a welcome greeting, is the salutation that Indians are globally welcomed with. Literal meaning – ‘I salute the divinity in you.
Mudras are not just a gesture or a sign. When we are exercising, only one area of our body is being worked upon. But, when we do a mudra, it acts as a seal or bond which brings our whole body in alignment with the energy associated with the mudra. Anjali in Sanskrit means an offering to the divine. And, when we practice the Anjali Mudra, we gain several subtle benefits from it which bring us closer to divinity.
Every Surya Namaskar starts with the practitioner bringing their hands in Anjali Mudra.
For Anjali Mudra, first, sit in a comfortable position. You can sit on a chair, cushion, or in a sukhasana.
Keep your spine relaxed and lengthened. You can even tuck your chin in slightly to stretch the spine (neck).
Then, slowly bring your hands together in front of your heart chakra, the Anahata chakra. This brings your awareness to your heart, letting energy flow from other points of your body to the heart center. The hands need to be pressed evenly and firmly together.
Hold for a few deep breaths and release the palms and keep them on your lap. Repeat this process a few times.
Paschim Namaskar
Paschim = west, meaning backside; namaskar = greeting; asana = pose
Paschim Namaskarasana or the Reverse Prayer pose is an upper body strengthening pose that works specifically on the arms and the abdomen. It is also known as Viparita Namaskarasana.
Begin in standing Tadasana or seated comfortably on the chair or your mat. Relax the shoulders.
As you inhale bring your arms behind your back and join the palms with fingertips facing upward.
Ensure that the palms are pressed firmly against each other.
Stay in the position for a couple of breaths.
As you exhale, slowly turn the fingertips downward.
Bring the arms down to the sides and slowly come back into Tadasana or place the palms on the thighs (when seated).
Contraindications:
Paschima Nasmaskara
People with low blood pressure, arm or shoulder injury should avoid doing this pose
Benefits:
Namaskar Mudra / Anjali Mudra
When we fold our hands together, we are bringing both the hemispheres of our brain in alignment with each other. Our left brain – logical and reasoning faculties and our right brain – creative faculties. We also bring together intuition and logic, feminine and masculine, energies of our being.
Every time you bring your hands together, feel the two different aspects of your energy coming together in balance and harmony.
While you are doing the Anjali Mudra, it is important to be aware of the sensations that happen when you bring your palms together. Doing it slowly can make it easier for you to feel the vibrations. As you do it several times, notice the change in vibrations, and see if the experience changes after repeated practice.
Instills a feeling of humility, groundedness and gratitude simultaneously.
Calms the heartbeat, improves the circulation of oxygen in the blood.
Bringing your hands together not only balances the working of the adrenal and pituitary glands, but it also gives a jolt to your intuitive capabilities.
Bringing together of brain hemispheres improves their coordination and functioning.
Practicing Anjali Mudra regularly brings more awareness, enhances concentration, and calms the mind thereby relieving stress.
Physically it improves flexibility of the arm joints and wrists.
Aside from stimulating the Anahata chakra (dealing with our emotions), the regular practice of Anjali Mudra is seen to stimulate the Ajna chakra (increases our focus and memory prowess) as well.
The human fingers are associated with the five elements that make up the entire creation. Thumb is Agni (fire), the index finger is Vayu (air), the middle finger is Aakash (space), the ring finger is Prithvi (earth), and the little finger is Jal (water). When we bring the hands together in Anjali Mudra, we also activate the elements in our bodies. When practiced regularly, these elements and all the tissues and organs associated with them also come in a balanced state.
Paschima Nasmaskara
Opens the chest improves the muscles for respiration.
Stretches the upper back, the shoulder joints and pectoral muscles.
Strengthens the wrists and arms as well.
Since both palms come together it has the same benefits as Anjali mudra.
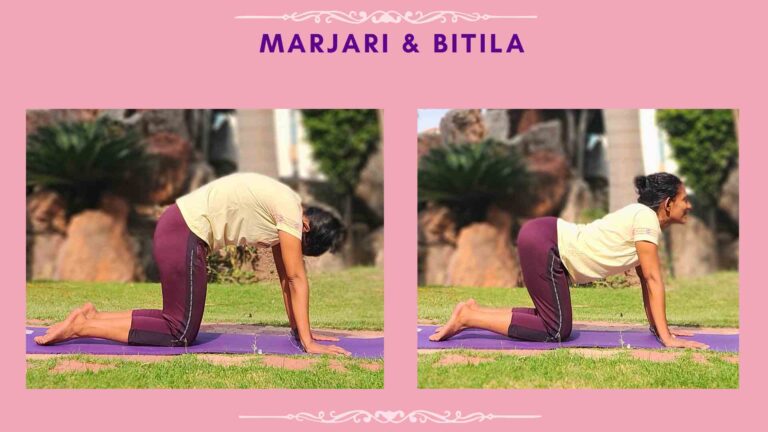
Marjari & Bitilasana – Forward Bend & Backward Bend
Marjari meaning Cat, Bitila meaning Cow
In this asana, sit in Vajrasana then come on all fours or table top with with knees and palms on the floor. The palms are at shoulder distance on the floor also the knees and feet are at hip distance apart. The palms are directly under the shoulder with arm perpendicular to the floor and the knees are under the hips. Look straight ahead. As you inhale, raise your chin, tilt your head and chest back pushing the palms firmly into ground push your navel downwards and raise your tailbone. Hold this cat pose and take long, deep breaths.
Follow this by Bitilasana, a counter pose: As you exhale, drop your chin to your chest and arch your back up as much as you can; pull in the pelvic and chest to form a curve in the spine. Hold this pose for a few seconds.
Contraindications:
Weak wrists injury or surgery to wrists
Shoulder injury back injury
Weak or injured knee – use padding under knees
Benefits:
Brings flexibility to the spine
Stretches the back and relaxes it
Stretches the scapula out and in and increases mobility
Strengthens lower back
Strengthens wrists and shoulders
Massages the digestive organs and improves digestion
Tones the abdomen
Relaxes the mind
Relieves menstrual pain
Improves focus
Improves blood circulation
Adho Mukha Svanasana – Inversion Asana
Adho meaning down, mukho meaning Face, svana meaning Dog. This asana too is part of the flow of surya namasakar (salute to the sun).
The name is derived from the way the dog stretches his front limbs when getting up.
In this pose, we can start by sitting on all fours in a table top position with knees and palms on the floor. The palms are at shoulder distance on the floor also the knees and feet are at hip distance apart. Lift the knees up to raise the hips up as you inhale. The weight of the body is on both palms and feet. With both arms straight at the elbows and the legs being straight at the knees the hips are raised up the head is down with arms close to the ears. We try to press the chest into the thighs just as we try to close a book to make a V shape. As you exhale, lower down the knees, hips and back into table top.
Contraindications:
Pregnant women, high blood pressure, Weak eye capillaries,
detached retina, or any other infection or inflammation of the eyes and ears and shoulder or back injury
Benefits:
Stretches the hamstring and calf muscles
Strengthens arms and shoulders, legs and ankles
Relaxes and strengthens back muscle
Strengthens abdominal muscles and core
Improves posture
And calms the heart
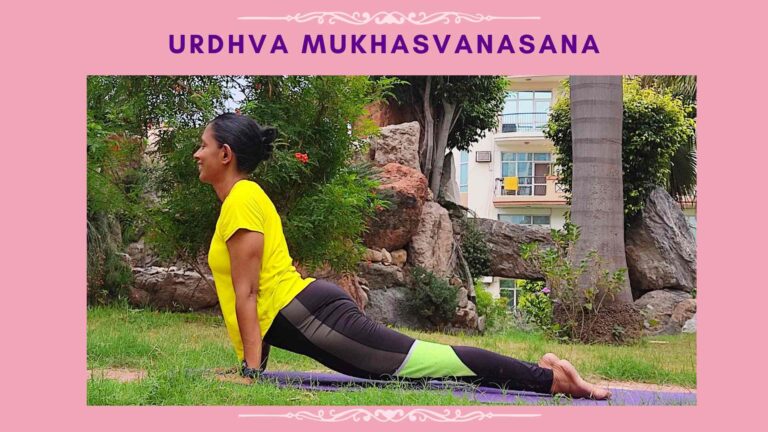
Urdhva Mukha Svanasana – Prone Pose
Urdhva = Upward, Mukha = Face, Svana = Dog, Asana = Pose
Urdhva Mukha Svanasana or upward dog pose is a back-bending yoga posture that strengthens the arms, wrists and spine. It also stretches the back and relieves the body of lower back ache.
For this pose, lie flat on your abdomen with the top of your feet facing downwards and soles facing the ceiling.
Bend your elbows and place your palms beside on the floor close to the waist.
As you inhale, press your palms firmly on the mat and slowly lift your torso upwards, hips and knees off the mat. The entire weight of the body should be resting on the palms and on the feet. Gaze straight ahead. Ensure that your wrists are stacked under your shoulders and the neck is not strained. Make sure the shoulder is rolled back ( not hunching) and chest is out. And there is space between the ears and the shoulders.
Stay in this pose for a couple of breaths.
As you exhale, slowly lower your knees, hips and torso back on the mat. And slowly lower the torso and head in front.
Contraindications:
People with Carpel Tunnel Syndrome or a back injury and Pregnant women should refrain from doing this asana.
Benefits:
Stretches and strengthens the back, relieves lower back ache.
Most of the body weight is borne by the arms and wrists, thus strengthening them.
Improves the body posture and also stimulates the abdominal organs.
Phalakasana – Prone Pose
Phalakasana or Plank Pose is a transitional pose that prepares your body for other Asanas. Just as the name suggests the practitioner’s body is held in a plank-like position.
From standing bend forward place palms on floor, step with both feet back 4-5 feet into a push-up position.
Spread the fingers wide apart, press into the palms with the arms straight at elbows. Tuck the tailbone in and toes press into the ground so the legs, hips and torso are in one straight line. Pull the crown of the head forward and with the toes tucked on the ground, press the heels back. Breathe and hold for 1-4 breaths.
To release: bend the knees to the floor into Shashank asana, and sit up in Vajrasana.
Contraindications:
Patients with high blood pressure patients or anxiety disorder should not practice it. People having carpal tunnel syndrome should refrain. If you are suffering from wrist, arm or leg injury, then please refrain.
Benefits:
Excellent pose for building core muscle strength.
Increases your stamina and enhances your metabolism it tones the muscles of the abdomen and core, the transverse abdominis, internal and external obliques. It also tones your core and reduces belly fat.
In turn, back pain decreases.
Strengthens the muscles in your neck, shoulder, biceps, triceps, lower back, knee, hamstrings, calves, hips and quadriceps.
Helps strengthen chest muscles and improves the functioning of your respiratory system.
Alleviates insomnia, migraines, menopause and osteoporosis.
Reduces stress.
Regular practice of this asana creates new bone tissue. This strengthens your bones and makes them healthier. It also makes your spine strong, thereby improving your posture.
Helps to increase mental endurance.
Stimulates and balances the Solar Plexus (Manipura) Chakra. It allows you to increase external and internal heat, thus increasing energy.
Increases Tapas in both your practical life and in your stance.
Calms your mind.
Purvottanasana – Supine Pose
Purvottanasana, the meaning of Purva is ‘East’, uttan is ‘stretch’. This is the reverse pose of simple plank pose. The Purvottanasana means an extreme eastside stretch. East means the front of the body
First get into Dandasana sit on mat with legs together and outstretched in front.
Keep your hands behind your hips, so that your fingertips are facing towards your hips.
Now bend your knees, place the soles of your feet on the floor hip-width apart.
Exhale and push your hands and feet strongly onto the ground as you lift your hips and abdomen up. Keep your arms straight at the elbows. With the help of your spinal muscles straighten your legs from the knees as well and point your toes out. Raise your hips as high as possible, and keep your glutes and legs firm and strong. Now raise your chest up as well and shoulders up, allow your head to slowly hang behind as you look up. Remain in the pose about 5 to 6 breaths. Exhale as you lower down your body and get into the initial pose.
Repeat this process around 3 to 5 times.
Contraindications:
Refrain if you have an injury at the wrist, neck, or back. People with high blood pressure should never perform it without supervision. Those with severe migraine, carpel tunnel syndrome must not perform this pose.
Benefits:
Stretches the chest, shoulders, biceps and the front of your ankles.
Strengthens your, arms, legs, core and back.
Excellent counterpose for plank – staff pose.
Strengthens your arms, wrists, hamstrings and glutes.
Good therapeutics for depression or fatigue and relaxes your mind.
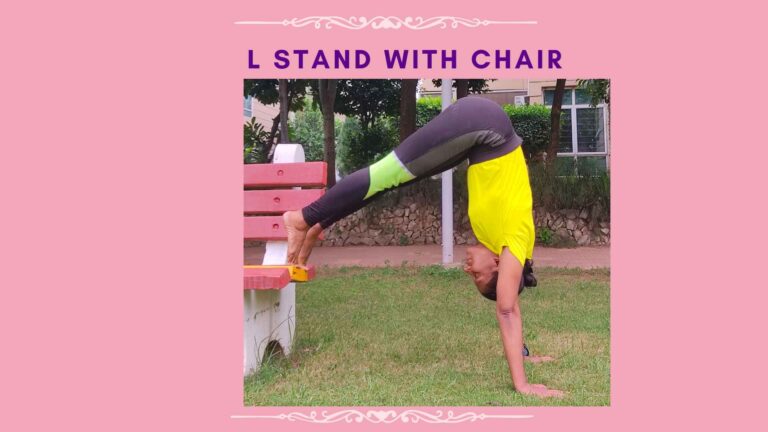
L-stand with Chair – Inversion Pose
Ardha Adho Mukho Vrksasna – Half Handstand Pose / L-stand Pose with chair.
This is an inversion pose, it is an intermediate level yoga pose
For this asana, push a chair up against the wall with the seat facing away from the wall.
Stand facing away from the chair in front of the chair. Bend forward and downward, firmly press your palms onto the floor and place your feet on the chair seat.
Press your toes down into the chair as you elevate your hips.
Slowly walk your hands back so that they align under your shoulders.
Stack your hips above your shoulders. Make sure elbows are straight. Lengthen your neck and open your chest. Finally you are aligned in “L” Handstand but with the feet lower than the hips.
Contraindications:
Do not try this pose if you have a shoulder or wrist injury, have high blood pressure, if you are menstruating, pregnant or if you have a headache. glaucoma or detached retina.
Benefits:
Strengthens wrists, arms and shoulders building upper body strength.
Strengthens core.
Lengthens and stretches the spine
Improves body stability and balance.
Prepares you for other inversion poses.
Stimulates the Circulatory, Respiratory, Skeletal and Muscular Systems.
Energizes the entire body, builds self-confidence, Brings joy and drives away lethargy.